
Important safety information
This trigger must be installed by competent and qualified personnel. If you decide to install it yourself, you must fully understand how your firearm operates and ensure that the trigger functions safely.
- Never install or remove a trigger while ammunition is present in the firearm.
- Remember that an incorrectly installed or adjusted trigger can cause serious injury or death.
- WARNING: Insufficient sear engagement and/or an excessively light trigger-pull setting are dangerous and can cause accidents.
- As a general rule, we recommend that the trigger be installed and adjusted only by a qualified gunsmith. The firearm must be checked for safe operation after any work on or modification to the trigger system.
- Bix’n Andy accepts no responsibility for damage resulting from improper use of this trigger. As the original owner of this trigger, it is your responsibility to pass these instructions on to anyone to whom you give or transfer the trigger. If you lose these instructions, you can download them from www.bixn-andy.at.
This trigger was manufactured and inspected to the highest quality standards, and we expect it to be the best trigger you have ever owned. Its trigger characteristics are very light and crisp, helping you to improve your shooting results. The patented ball-bearing mechanism provides a highly consistent pull weight and therefore the shortest possible trigger release time.
Installing the trigger
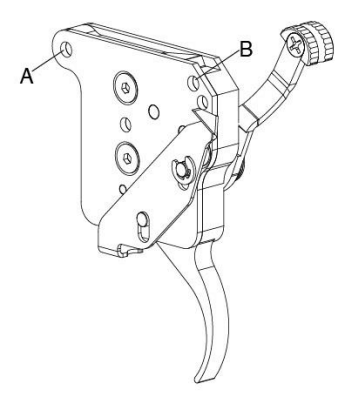
- Remove the bolt and magazine.
- Remove the stock from the action.
- If your action uses a trigger hanger, remove it.
- Remove the old trigger from the action or trigger hanger by removing the dowel pins from holes A and B.
- Position the trigger in the action or trigger hanger so that the holes in the trigger align with the dowel-pin holes, then reinstall the dowel pins. If you are using a trigger hanger, make sure it is correctly aligned. Do not force the dowel pins into place, as this could damage the trigger, trigger hanger or action. If there is excessive resistance, the holes are most likely not aligned correctly.
- If you are using a trigger hanger, reinstall it on the action.
- Reinsert the bolt and begin the adjustment procedure.
Adjusting the trigger
TacSport Single Stage – single-stage trigger
The trigger pull weight – 280-2,000 g for the TacSport Standard and 100-1,000 g for the TacSport Pro – and the sear engagement are adjustable. The trigger is factory-set to approximately 450 g on the TacSport Standard and approximately 200 g on the TacSport Pro. This is already ideal for many applications. The sear engagement is also optimally matched to the factory setting. If you require a different pull weight, follow these steps:
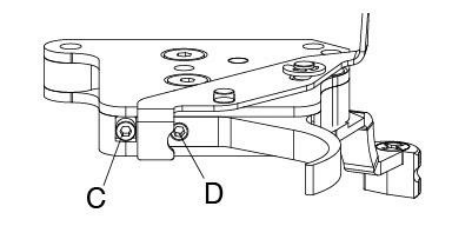
- Use the supplied 1.5 mm hex key to change the pull weight. Turn adjustment screw C clockwise to increase the pull weight. Turn it counterclockwise to reduce the pull weight. The adjustment screw has a stop at each end of its adjustment range. Do not force the screw beyond either stop.
- Changing the pull weight requires the sear engagement to be readjusted. In general, a lower pull weight requires greater sear engagement, and vice versa. Correct sear engagement is essential for a trigger that operates properly and, above all, safely. Sear engagement is adjusted at screw D, also using the supplied 1.5 mm hex key.
- Turn the adjustment screw counterclockwise to increase sear engagement; turn it clockwise to reduce sear engagement. As a starting point, reduce the sear engagement by turning the screw clockwise until the firing pin is no longer held when the bolt is closed. Then increase the sear engagement in very small increments – 1/16 of a turn, or 22.5 degrees – until the firing pin is held again. The trigger will probably not hold reliably in this position. Turn the adjustment screw counterclockwise by a further 1/16 of a turn.
- Test the firearm by closing the bolt quickly and confirming that the firing pin is held every time.
TacSport Two Stage – two-stage trigger
The total trigger pull weight is the sum of the first-stage pull weight and the second-stage pull weight. These two weights, together with the sear engagement and first-stage travel, can be adjusted independently. The minimum, maximum and factory-set values are shown in the table below. The sear engagement is also optimally matched to the factory setting.
| Model | Values | First-stage pull weight | Second-stage pull weight | Total pull weight |
|---|---|---|---|---|
| TacSport Standard | Min.-max. (factory setting) | 200-1,500 g (400 g) | 80-500 g (200 g) | 280-2,000 g (600 g) |
| TacSport Pro | Min.-max. (factory setting) | 60-800 g (250 g) | 60-400 g (200 g) | 120-1,200 g (450 g) |
If you require different pull weights or a different amount of first-stage travel, follow these steps:
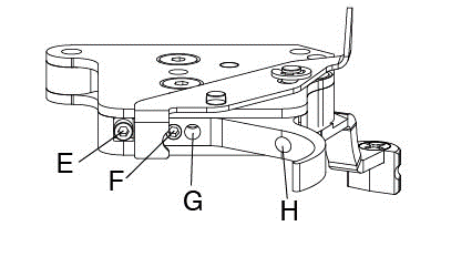
- Adjust the first-stage pull weight at screw E using the supplied 1.5 mm hex key. Turn the screw clockwise to increase the first-stage pull weight or counterclockwise to reduce it. Do not force the screw beyond the end of its adjustment range. Changing the first-stage pull weight does not require the sear engagement to be adjusted.
- To change the second-stage pull weight, turn screw H. Turn the screw clockwise to increase the second-stage pull weight or counterclockwise to reduce it.
- Adjust the first-stage travel using screw F. Turn the screw clockwise to shorten the first-stage travel or counterclockwise to lengthen it. Please note that reducing the first-stage travel to zero affects the sear engagement. We therefore recommend retaining at least a small amount of first-stage travel.
- If the second-stage pull weight is changed, the sear engagement must be readjusted using screw G. Follow steps 3 and 4 in the single-stage trigger instructions above.
Safety and bolt release
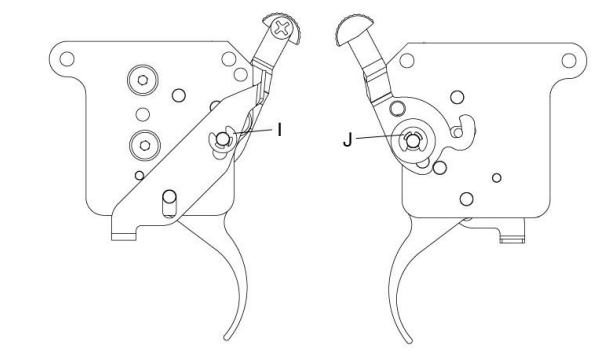
The TacSport trigger is supplied with a safety and a bolt release; the bolt release is for Remington 700 actions only. Both the safety and the bolt release can be removed if they are not required. To do so, use a screwdriver to remove the corresponding retaining clip (I or J) and keep the removed components.
The safety lever incorporates an additional safety feature that requires the lever to be moved slightly outward before it can be moved forward to the Fire position. This substantially reduces the risk of the safety being disengaged accidentally. It is possible to disable this safety feature by removing a dowel pin. However, we expressly recommend retaining this additional level of safety; you will quickly become accustomed to the new movement.
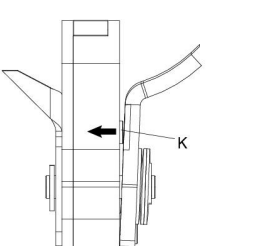
If you nevertheless prefer conventional safety operation, open the trigger cover and use a pin punch to drive pin K out from right to left.
Maintenance
The TacSport trigger was designed to protect its internal mechanism from environmental influences as effectively as possible. Despite the best mechanical protection, a trigger can never be hermetically sealed. Under certain conditions, dust, dirt, powder granules and water can therefore enter the trigger and impair its operation.
We recommend cleaning the trigger periodically at intervals appropriate to its intended use. Never attempt to flush cleaning agents through the trigger while it is closed. Doing so can wash dirt into narrow gaps and seriously impair operation.
Remove the cover by loosening the Torx screws, then clean the interior with brake cleaner. Take care not to lose the ball bearings. Once the trigger is completely dry, it can be reassembled.
The trigger was designed to operate completely dry. Do not lubricate it under any circumstances. Gun oils and similar products become gummy over time and impair operation.
If you experience any problem, please contact us without hesitation. We are pleased to have supplied you with this trigger and hope it will help you improve your results and enjoy your sport even more.
Your Bix’n Andy Team